Make a Fall Wreath with Pampas Grass
A fall wreath that actually looks modern and cool? I'm in!

I've shared plenty of DIY wreaths over the years, but commonly they're winter and holiday related. Concluding year, though, I made my first DIY fall wreath and now I'm in dear. Especially because information technology means I get to play around with dried grasses and florals.
I foraged some pampas grass, broke out my beloved collection of dried palm leaves and tracked down some really pretty dried mushrooms (!!!).
All to make these elementary, modern fall wreaths that are equally far from grandma'southward pinecone door wreath as I could get. Non trying to detest on grandma though. She can keep those pinecone wreaths upwards equally long as she likes.
Click through for the full breakdown for making your own modern wreath this autumn.
One of the things that I similar almost about this fall wreath idea is that it exist tin hung anywhere from a blank wall in the entryway to the front door. You can pair a few together to brand a big statement or merely one to keep the fall vibes to a minimum.
Great Thanksgiving decor besides! Or even equally teeny tiny wreath identify setting decor for the Thanksgiving dinner tabular array.
So, I guess what I'm really trying to say hither, is there are lots of possibilities with this fall decor project. Haha.

Materials Needed for Pampas Grass Wreath
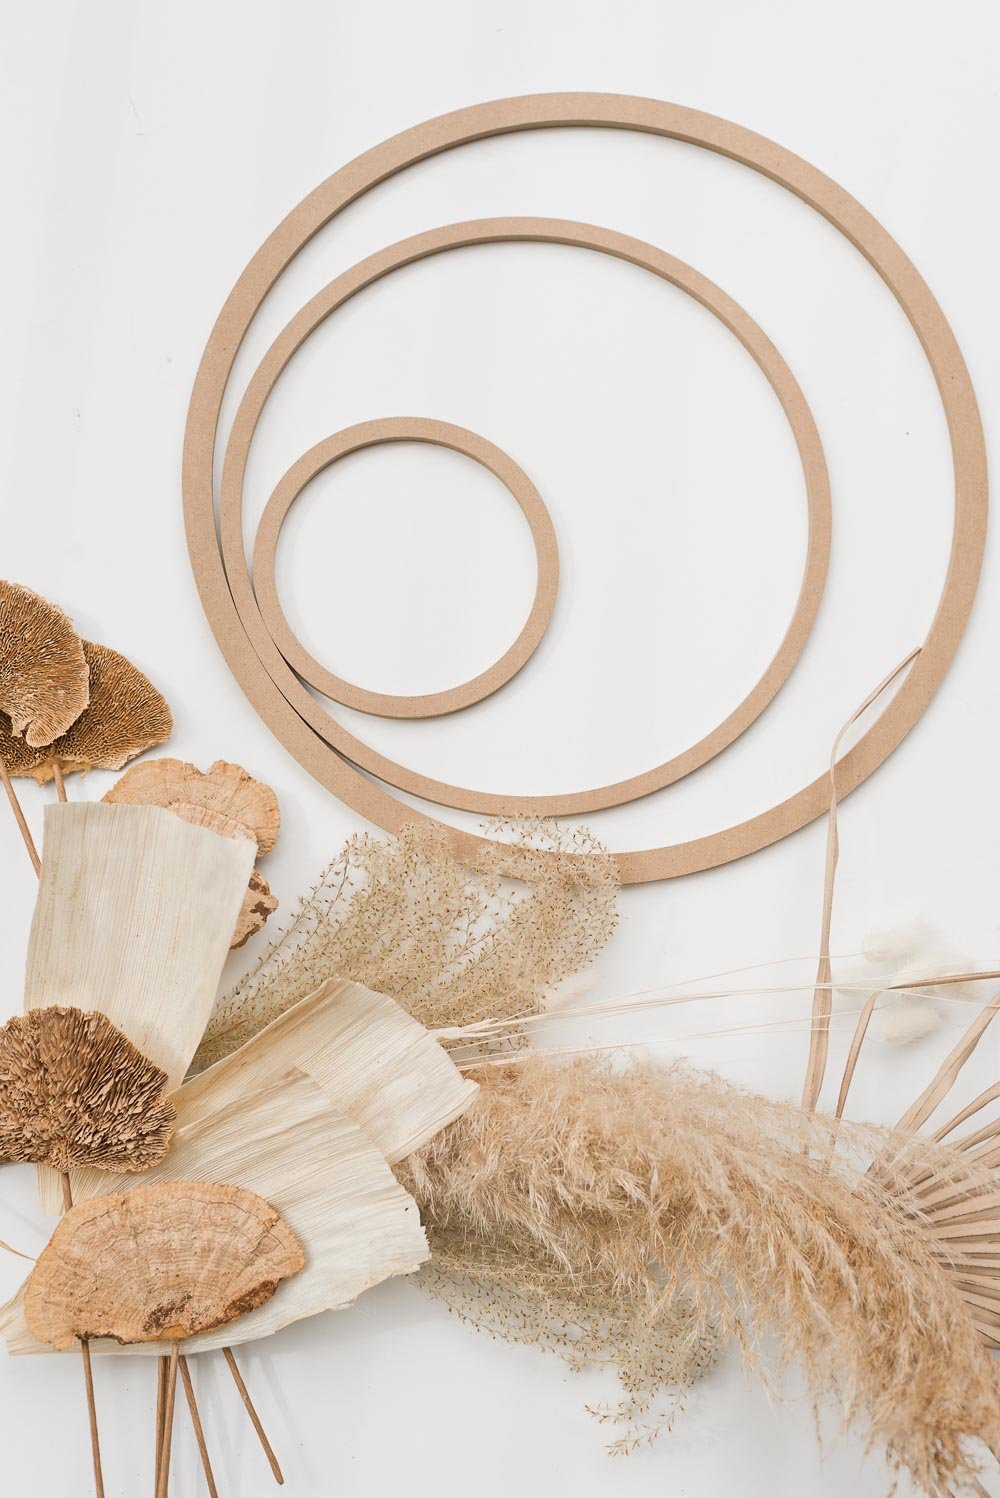
- floral craft rings in various sizes*
- acrylic paint** and pigment castor
- stale plants and florals***
- corn husks (optional)
- hot mucilage gun and hot mucilage sticks
- yarn (optional)
- pair of scissors
Material / Supply Notes
*I linked the verbal make I used. And I went with wreaths in the following sizes: half dozen inch, 12 inch, and xvi inch.
**I used Liquitex unbleached titanium, but whatever arts and crafts paint in antique white would be pretty close in colour, to save a few dollars on paint.
***I purchased all of my dried pieces locally – i a wholesale florist and the other at a boutique store. And I foraged some pampas grass from an carelessness lot on the style to my son's school. Haha. But you can also buy pampas grass in some flower shops. Etsy also has lots of cute dried items to utilize.

How to Brand Fall Wreaths
Starting time by painting the floral craft ring with a sparse, even coat of paint all the fashion effectually (and the sides – not need to paint the back if it won't exist seen).
Wait for the paint to dry and practise a second glaze if needed.
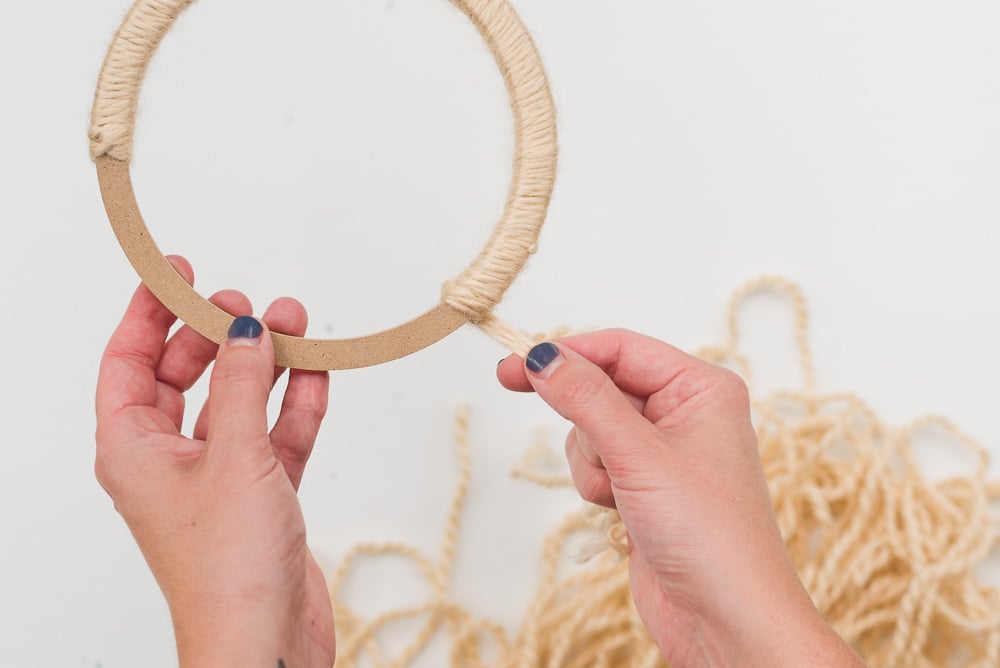
OR instead of painting, y'all tin wrap the craft band in yarn. This volition give your wreath a softer, more than homey vibe.
Information technology'southward a lilliputian less modern and sleek than the painted ones, but wanted to share it as some other selection simply in example.
Start past double knotting the yarn around the band to attach it and then wrap continuously around the ring until the entire ring is covered. Knot the terminate to secure and/or add together hot glue.
Next, experiment with how y'all want all the stale pieces to be layered.
I like to start with the bigger pieces showtime (dried palms, pampas grass, etc) and then commencement layering in the medium (mushrooms, smaller grasses, corn husks) and small pieces (wheat, etc) on top.
If things are non plumbing equipment the way you want them to, don't exist afraid to cut some grasses or leaves down. I cut two of my dried palm leaves into much smaller shapes to fit a couple of wreaths and it really helped.
Annotation near laying out pieces for your fall wreath
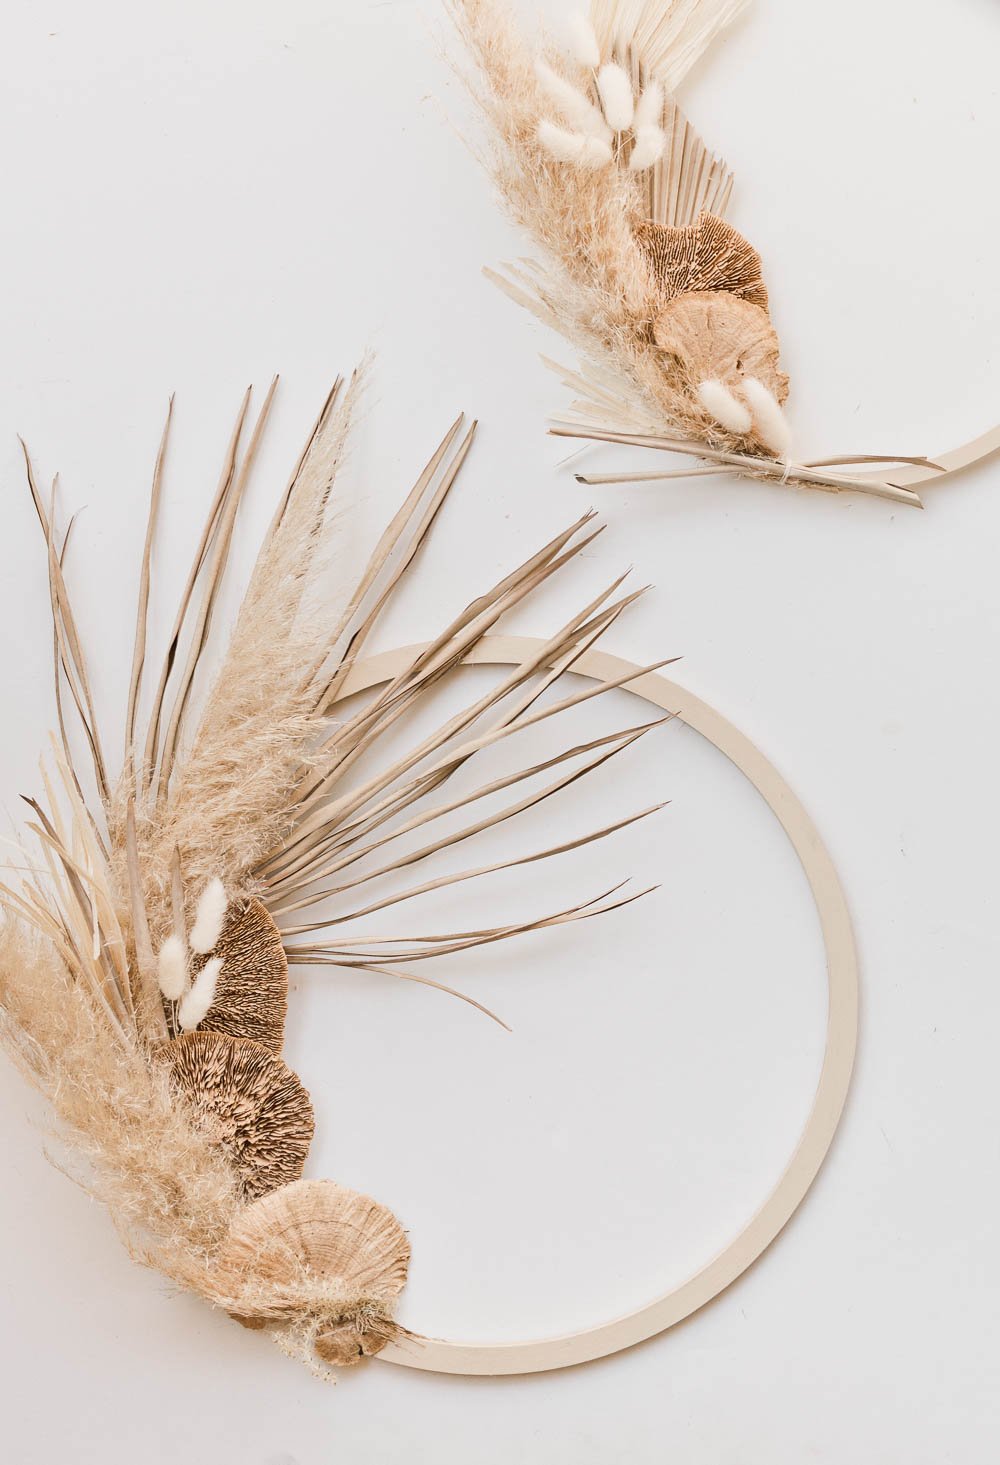
I made all of my autumn wreaths asymmetrical in pattern because I call up it adds a more than modern and unique pattern touch on.
Merely you tin very easily create a pattern that is more symmetrical and/or goes over the entire surface of the wreath.
Working with corn husks
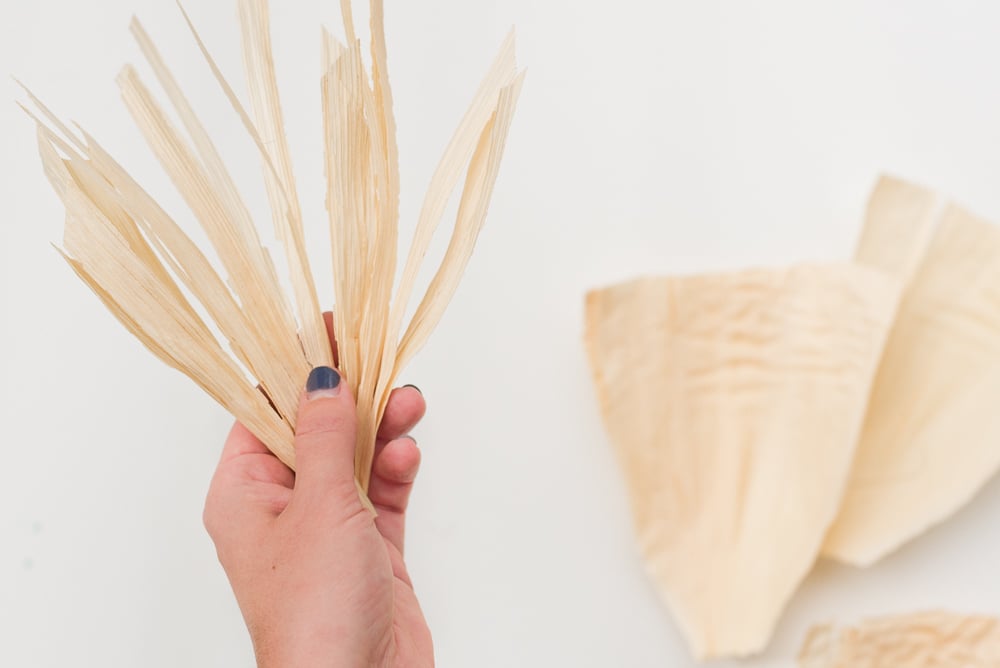
I like calculation in corn husks to this fall wreath thought for extra texture.
I just rip small pieces down from the tiptop of the husk toward the middle of the husk to create a fringe (similar the photo). This makes a great filler for any empty areas that need to be filled in.
Once all the pieces have been mapped out, information technology's time to get-go glueing them down.
Showtime with the pieces that will be touching the hoop itself (so the pieces furthest back in the layered blueprint you've created).
Add together a bead of hot gum to the apartment part of the ring and then adhere the dried pieces on superlative. Exist very careful with your fingers, that hot glue can burn your fingers if non careful.

Once the bottom layer is attached to the wreath, keep glueing layers on top of that ane until your pattern is completed.
Whenever possible, try to find areas to mucilage to that are the floral ring itself, which is the strongest spot to secure leaves and dried items. If that's not possible, expect for flat areas in the layers underneath whenever possible.
This will help make sure everything stay secure.
Note virtually glueing pieces onto your fall wreath
I found that waiting 5 minutes or then between layers is helpful. It gives the glue time to harden and fix a bit before adding additional layers that could weigh information technology down.
One time all the layers have been glued down, you can add small and skinny pieces of string to whatever areas that wait like they need added security.
I did this on ane of my fall wreaths as a blueprint detail, where you tin can see it in the finished piece). And 1 in another autumn wreath where you tin can't come across it in the terminal piece (I fluffed some pampas grass effectually that one, so it wouldn't be seen).

How to Hang Your Autumn Wreath
And then it's prepare to hang.
If you've made an asymmetrical wreath like mine, you may need an actress support nail or button pin to aid keep your wreath from shifting effectually from the asymmetrical weight.
So, I recommend adding a minor finishing boom, Command hook, or push pin toward the bottom of the weighted portion of your autumn wreath arrangement. That should keep it in place and won't be seen bc your stale florals will cover information technology.
Make sense? Shoot me a question in the comments if yous take whatsoever trouble.

More Fall DIY Ideas
Looking for more than festive fall DIYs? Try some of these…
- Fall decorating – They're all super affordable besides!
- Fall recipes – You have to try #2 on this list! So adept.
- Pumpkin muffins – These are so like shooting fish in a barrel and taste amazing.
- White edible bean soup – I make some variation of this soup every year.
- Pumpkin candy – If yous like pumpkin pie, you'll love these candy cups!
- Pumpkin ice cream – For pumpkin lovers.
More than Wreath Ideas
OR maybe you lot but want some more wreath inspiration? I have some of that as well…
- I made a behemothic wreath (like 3 ft tall) that'southward shaped like a triangle if yous desire to take a wait. This one might be my favorite.
- And this ane will prove you how to brand a wreath that is more than asymmetrical, which seems to be everyone else's favorite.


How to Make a Fall Wreath
- floral craft rings in various sizes I linked the exact brand I used. And I went with wreaths in the post-obit sizes: 6 inch, 12 inch, and 16 inch.
- acrylic pigment and pigment brush I used Liquitex unbleached titanium, but any craft paint in antique white would be pretty close in colour, to save a few dollars on paint.
- dried plants and florals I purchased all of my stale pieces locally - ane a wholesale florist and the other at a bazaar shop. And I foraged some pampas grass from an carelessness lot on the way to my son's schoolhouse. Haha. Merely you can besides buy pampas grass in some bloom shops. Etsy too has lots of beautiful dried items to use.
- corn husks optional
- hot gum gun and hot mucilage sticks
- yarn optional
- scissors
Start by painting the floral arts and crafts ring with a thin, even coat of pigment all the way around (and the sides - not demand to paint the back if it won't exist seen).
-
Wait for the pigment to dry out and practice a second glaze if needed.
OR instead of painting, you can wrap the craft ring in yarn. This will requite your wreath a softer, more homey vibe. It'southward a lilliputian less modernistic and sleek than the painted ones, simply wanted to share it as another option merely in case.
-
Start by double knotting the yarn effectually the ring to attach it and then wrap continuously around the band until the unabridged ring is covered. Knot the stop to secure and/or add hot glue.
Next, experiment with how you want all the stale pieces to exist layered.
-
I like to start with the bigger pieces get-go (dried palms, pampas grass, etc) and so start layering in the medium (mushrooms, smaller grasses, corn husks) and small pieces (wheat, etc) on top.
-
If things are not fitting the way you want them to, don't be afraid to cut some grasses or leaves down. I cut two of my stale palm leaves into much smaller shapes to fit a couple of wreaths and it really helped.
Note about laying out pieces for your fall wreath
-
I made all of my fall wreaths asymmetrical in blueprint because I think information technology adds a more modernistic and unique pattern touch.
-
Simply you can very easily create a design that is more symmetrical and/or goes over the entire surface of the wreath.
Working with corn husks
-
I like adding in corn husks to this fall wreath idea for extra texture.
-
I but rip small pieces downward from the superlative of the husk toward the middle of the husk to create a fringe (similar the photo). This makes a neat filler for any empty areas that need to be filled in.
One time all the pieces have been mapped out, information technology's time to commencement glueing them downwardly.
-
Start with the pieces that volition be touching the hoop itself (and then the pieces furthest dorsum in the layered design you've created).
-
Add a bead of hot gum to the apartment office of the ring and and so attach the dried pieces on top. Be very careful with your fingers, that hot gum can burn down your fingers if not careful.
-
Once the bottom layer is fastened to the wreath, keep glueing layers on summit of that one until your design is completed.
-
Whenever possible, try to notice areas to glue to that are the floral ring itself, which is the strongest spot to secure leaves and dried items. If that's not possible, await for flat areas in the layers underneath whenever possible.
-
This will help make sure everything stay secure.
Note about glueing pieces onto your fall wreath
-
I establish that waiting five minutes or and so between layers is helpful. It gives the glue fourth dimension to harden and set a bit before calculation boosted layers that could weigh it down.
-
In one case all the layers accept been glued down, you can add pocket-sized and skinny pieces of string to whatever areas that look similar they demand added security.
-
I did this on ane of my fall wreaths equally a design detail, where y'all can see it in the finished slice). And one in another fall wreath where you can't meet it in the final piece (I fluffed some pampas grass around that 1, so information technology wouldn't be seen).
All finished!
How to Hang Your Fall Wreath
If you've fabricated an asymmetrical wreath similar mine, you lot may need an extra back up nail or push pin to help proceed your wreath from shifting around from the asymmetrical weight.
So, I recommend adding a pocket-sized finishing nail, Command hook, or push pivot toward the bottom of the weighted portion of your fall wreath arrangement. That should keep it in place and won't be seen bc your stale florals volition encompass it.
Make sense? Shoot me a question in the comments if you accept any problem.
Photography Amelia Lawrence
Have y'all ever made a fall wreath before? Or worked with dried florals or grasses? What practise you think of this autumn decor projection?
Source: https://www.papernstitchblog.com/fall-wreath-diy/
0 Response to "Make a Fall Wreath with Pampas Grass"
Post a Comment