How to Upload Rsps Files to Java Vnc Client
Introduction
Virtual Network Computing, or VNC, is a connection organization that allows you to apply your keyboard and mouse to collaborate with a graphical desktop surroundings on a remote server. It makes managing files, software, and settings on a remote server easier for users who are non yet comfortable with the command line.
In this guide, you'll set up a VNC server with TightVNC on an Ubuntu 20.04 server and connect to it securely through an SSH tunnel. And so, you'll use a VNC client program on your local machine to collaborate with your server through a graphical desktop environment.
Prerequisites
To complete this tutorial, y'all'll need:
- One Ubuntu 20.04 server with a non-root authoritative user and a firewall configured with UFW. To set up this up, follow our initial server setup guide for Ubuntu twenty.04.
- A local computer with a VNC client installed. The VNC client y'all use must support connections over SSH tunnels:
- On Windows, you can use TightVNC, RealVNC, or UltraVNC.
- On macOS, y'all can utilise the built-in Screen Sharing program, or can use a cross-platform app like RealVNC.
- On Linux, you lot tin cull from many options, including
vinagre,krdc, RealVNC, or TightVNC.
Step 1 — Installing the Desktop Surroundings and VNC Server
By default, an Ubuntu 20.04 server does not come with a graphical desktop environs or a VNC server installed, so you'll brainstorm by installing those.
You lot have many options when it comes to which VNC server and desktop environment yous choose. In this tutorial, you volition install packages for the latest Xfce desktop environment and the TightVNC bundle available from the official Ubuntu repository. Both Xfce and TightVNC are known for being lightweight and fast, which volition aid ensure that the VNC connection will be smooth and stable even on slower internet connections.
After connecting to your server with SSH, update your list of packages:
- sudo apt update
Now install Xfce along with the xfce4-goodies packet, which contains a few enhancements for the desktop surroundings:
- sudo apt install xfce4 xfce4-goodies
During installation, you may exist prompted to choose a default display manager for Xfce. A display manager is a programme that allows you to select and log in to a desktop environment through a graphical interface. You'll just be using Xfce when yous connect with a VNC client, and in these Xfce sessions you lot'll already be logged in as your non-root Ubuntu user. So for the purposes of this tutorial, your option of display director isn't pertinent. Select either one and press ENTER.
Once that installation completes, install the TightVNC server:
- sudo apt install tightvncserver
Next, run the vncserver command to set a VNC access password, create the initial configuration files, and offset a VNC server instance:
- vncserver
You'll be prompted to enter and verify a password to access your machine remotely:
Output
You will require a password to access your desktops. Password: Verify: The countersign must be between vi and viii characters long. Passwords more than 8 characters volition be truncated automatically.
Once you verify the password, you'll have the option to create a view-only countersign. Users who log in with the view-only password volition not exist able to control the VNC instance with their mouse or keyboard. This is a helpful option if you want to demonstrate something to other people using your VNC server, simply this isn't required.
The process and so creates the necessary default configuration files and connection information for the server. Additionally, it launches a default server instance on port 5901. This port is called a display port, and is referred to by VNC as :ane. VNC can launch multiple instances on other display ports, with :2 referring to port 5902, :3 referring to 5903, and so on:
Output
Would y'all similar to enter a view-only password (y/northward)? northward xauth: file /home/sammy/.Xauthority does non be New 'X' desktop is your_hostname:1 Creating default startup script /home/sammy/.vnc/xstartup Starting applications specified in /dwelling house/sammy/.vnc/xstartup Log file is /home/sammy/.vnc/your_hostname:1.log Notation that if you always want to alter your password or add a view-only password, you can do and then with the vncpasswd command:
- vncpasswd
At this point, the VNC server is installed and running. At present let's configure information technology to launch Xfce and give us access to the server through a graphical interface.
##Pace ii — Configuring the VNC Server
The VNC server needs to know which commands to execute when it starts up. Specifically, VNC needs to know which graphical desktop environment information technology should connect to.
The commands that the VNC server runs at startup are located in a configuration file chosen xstartup in the .vnc folder nether your dwelling directory. The startup script was created when you ran the vncserver command in the previous step, but you'll create your ain to launch the Xfce desktop.
Because you are going to be changing how the VNC server is configured, beginning stop the VNC server instance that is running on port 5901 with the following control:
- vncserver -impale :ane
The output will look similar this, although y'all'll come across a different PID:
Output
Killing Xtightvnc process ID 17648 Earlier you change the xstartup file, back up the original:
- mv ~/.vnc/xstartup ~/.vnc/xstartup.bak
At present create a new xstartup file and open up it in a text editor, such equally nano:
- nano ~/.vnc/xstartup
So add the following lines to the file:
~/.vnc/xstartup
#!/bin/fustigate xrdb $Habitation/.Xresources startxfce4 & The first line is a shebang. In executable patently-text files on *nil platforms, a shebang tells the system what interpreter to pass that file to for execution. In this case, you're passing the file to the Bash interpreter. This will let each successive line to be executed as commands, in order.
The offset command in the file, xrdb $HOME/.Xresources, tells VNC's GUI framework to read the server user's .Xresources file. .Xresources is where a user tin can make changes to sure settings of the graphical desktop, like terminal colors, cursor themes, and font rendering. The second command tells the server to launch Xfce. Whenever you lot start or restart the VNC server, these commands will execute automatically.
Save and close the file after adding these lines. If you used nano, do and so by pressing CTRL + Ten, Y, and so ENTER.
To ensure that the VNC server will be able to use this new startup file properly, you lot'll need to make it executable:
- chmod +10 ~/.vnc/xstartup
Then restart the VNC server:
- vncserver -localhost
Notice that this time the command includes the -localhost selection, which binds the VNC server to your server'due south loopback interface. This will cause VNC to only allow connections that originate from the server on which it's installed.
In the side by side step, you'll establish an SSH tunnel between your local machine and your server, essentially tricking VNC into thinking that the connection from your local car originated on your server. This strategy will add an extra layer of security around VNC, equally the but users who will exist able to access information technology are those that already have SSH admission to your server.
Y'all'll run into output like to this:
Output
New 'X' desktop is your_hostname:ane Starting applications specified in /dwelling/sammy/.vnc/xstartup Log file is /dwelling house/sammy/.vnc/your_hostname:i.log With the configuration in place, you're ready to connect to the VNC server from your local motorcar.
Step 3 — Connecting to the VNC Desktop Securely
VNC itself doesn't use secure protocols when connecting. To deeply connect to your server, you'll establish an SSH tunnel then tell your VNC client to connect using that tunnel rather than making a directly connection.
Create an SSH connexion on your local computer that securely forrard to the localhost connexion for VNC. You can do this via the terminal on Linux or macOS with the following ssh command:
- ssh -Fifty 59000 :localhost:5901 -C -N -l sammy your_server_ip
Here'south what this ssh command's options mean:
-
-Fifty 59000:localhost:5901: The-Lswitch specifies that the given port on the local reckoner (59000) is to be forwarded to the given host and port on the destination server (localhost:5901, meaning port5901on the destination server, defined asyour_server_ip). Note that the local port you specify is somewhat arbitrary; as long as the port isn't already bound to some other service, you lot tin use it every bit the forwarding port for your tunnel. -
-C: This flag enables compression which can help minimize resources consumption and speed things up. -
-Due north: This pick tellssshthat you don't desire to execute whatsoever remote commands. This setting is useful when y'all just want to frontwards ports. -
-50 sammy your_server_ip: The-50switch let's you lot specify the user y'all desire to log in as once you connect to the server. Make sure to replacesammyandyour_server_ipwith the name of your not-root user and your server's IP accost.
Note: This command establishes an SSH tunnel that forwards information from port 5901 on your VNC server to port 59000 on your local automobile via port 22 on each machine, the default port for SSH. Assuming y'all followed the prerequisite Initial Server Setup guide for Ubuntu 20.04, you volition accept added a UFW rule to allow connections to your server over OpenSSH.
This is more secure than merely opening up your server'due south firewall to allow connections to port 5901, as that would permit anyone to access your server over VNC. By connecting over an SSH tunnel, you're limiting VNC admission to machines that already have SSH access to the server.
If yous are using PuTTY to connect to your server, y'all can create an SSH tunnel by right-clicking on the height bar of the terminal window, then clicking the Change Settings… pick:
![]()
Find the Connectedness branch in the tree carte du jour on the left-hand side of the PuTTY Reconfiguration window. Aggrandize the SSH branch and click on Tunnels. On the Options controlling SSH port forwarding screen, enter 59000 equally the Source Port and localhost:5901 every bit the Destination, like this:

Then click the Add button, and then the Employ push button to implement the tunnel.
Once the tunnel is running, use a VNC customer to connect to localhost:59000. You'll be prompted to authenticate using the countersign you set in Step 1.
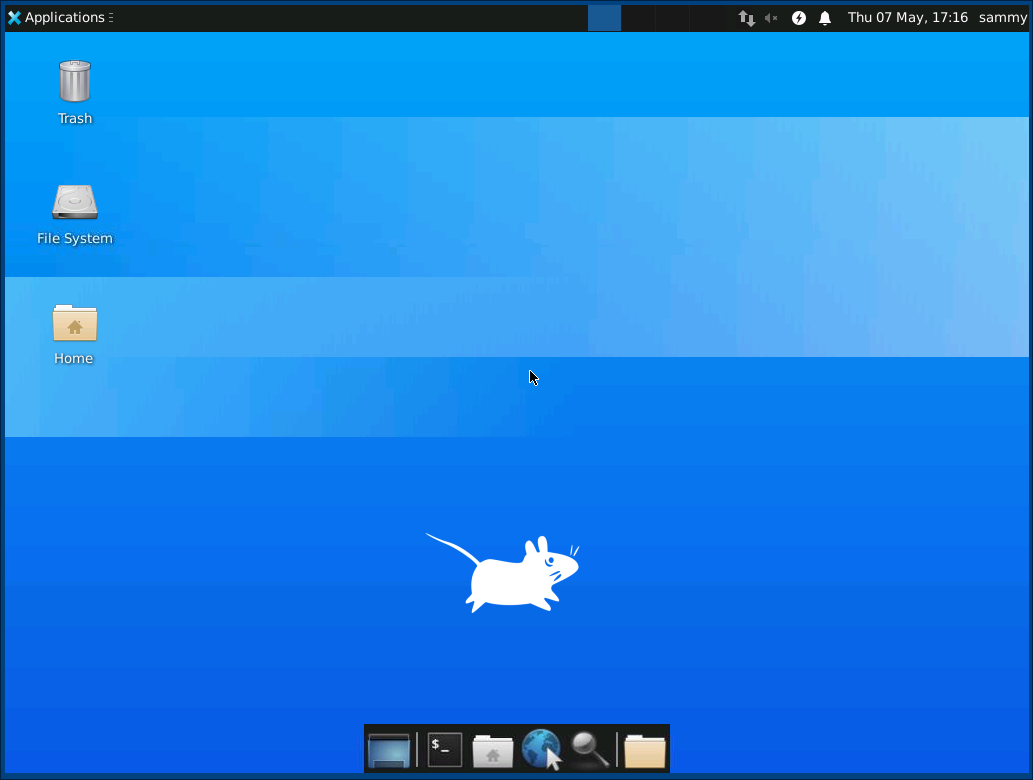
Once you are connected, y'all'll meet the default Xfce desktop. Information technology should look something like this:
You can admission files in your dwelling house directory with the file manager or from the control line, equally seen here:

Printing CTRL+C in your local concluding to stop the SSH tunnel and return to your prompt. This will disconnect your VNC session likewise.
Now you tin can configure your VNC server to run equally a systemd service.
Stride 4 — Running VNC every bit a System Service
By setting upwardly the VNC server to run as a systemd service you tin start, stop, and restart information technology equally needed, similar any other service. You can as well employ systemd'south management commands to ensure that VNC starts when your server boots up.
First, create a new unit file called /etc/systemd/arrangement/vncserver@.service:
- sudo nano /etc/systemd/system/vncserver@.service
The @ symbol at the end of the name will let us laissez passer in an argument y'all can use in the service configuration. You lot'll use this to specify the VNC brandish port you want to use when yous manage the service.
Add the following lines to the file. Exist sure to alter the value of User, Grouping, WorkingDirectory, and the username in the value of PIDFILE to match your username:
/etc/systemd/system/vncserver@.service
[Unit of measurement] Description=Start TightVNC server at startup Later=syslog.target network.target [Service] Type=forking User=sammy Group=sammy WorkingDirectory=/dwelling house/sammy PIDFile=/abode/sammy/.vnc/%H:%i.pid ExecStartPre=-/usr/bin/vncserver -kill :%i > /dev/null ii>&1 ExecStart=/usr/bin/vncserver -depth 24 -geometry 1280x800 -localhost :%i ExecStop=/usr/bin/vncserver -impale :%i [Install] WantedBy=multi-user.target The ExecStartPre command stops VNC if it'south already running. The ExecStart command starts VNC and sets the colour depth to 24-bit color with a resolution of 1280x800. You can modify these startup options too to meet your needs. Also, note that the ExecStart control again includes the -localhost choice.
Save and shut the file.
Adjacent, brand the system aware of the new unit file:
- sudo systemctl daemon-reload
Enable the unit file:
- sudo systemctl enable vncserver@1.service
The 1 following the @ sign signifies which display number the service should appear over, in this instance the default :i as was discussed in Step 2.
Stop the electric current instance of the VNC server if it's still running:
- vncserver -kill :one
And then start it as you would showtime any other systemd service:
- sudo systemctl beginning vncserver@1
You can verify that it started with this command:
- sudo systemctl status vncserver@i
If information technology started correctly, the output should look like this:
Output
● vncserver@1.service - Get-go TightVNC server at startup Loaded: loaded (/etc/systemd/system/vncserver@.service; enabled; vendor preset: enabled) Active: active (running) since Thu 2020-05-07 17:23:l UTC; 6s ago Procedure: 39768 ExecStartPre=/usr/bin/vncserver -impale :1 > /dev/nada 2>&one (code=exited, status=2) Process: 39772 ExecStart=/usr/bin/vncserver -depth 24 -geometry 1280x800 :one (code=exited, status=0/SUCCESS) Master PID: 39795 (Xtightvnc) ... Your VNC server is now ready to utilise whenever your server boots upward, and you can manage information technology with systemctl commands like any other systemd service.
However, at that place won't exist any departure on the client side. To reconnect, beginning your SSH tunnel once more:
- ssh -L 59000 :localhost:5901 -C -Due north -fifty sammy your_server_ip
So make a new connexion using your VNC client software to localhost:59000 to connect to your server.
Decision
Yous now have a secured VNC server up and running on your Ubuntu twenty.04 server. Now yous'll be able to manage your files, software, and settings with a user-friendly graphical interface, and yous'll be able to run graphical software like web browsers remotely.
Source: https://www.digitalocean.com/community/tutorials/how-to-install-and-configure-vnc-on-ubuntu-20-04
0 Response to "How to Upload Rsps Files to Java Vnc Client"
Post a Comment